DIY Fire Pit Installation Guide – Quick & Easy Steps
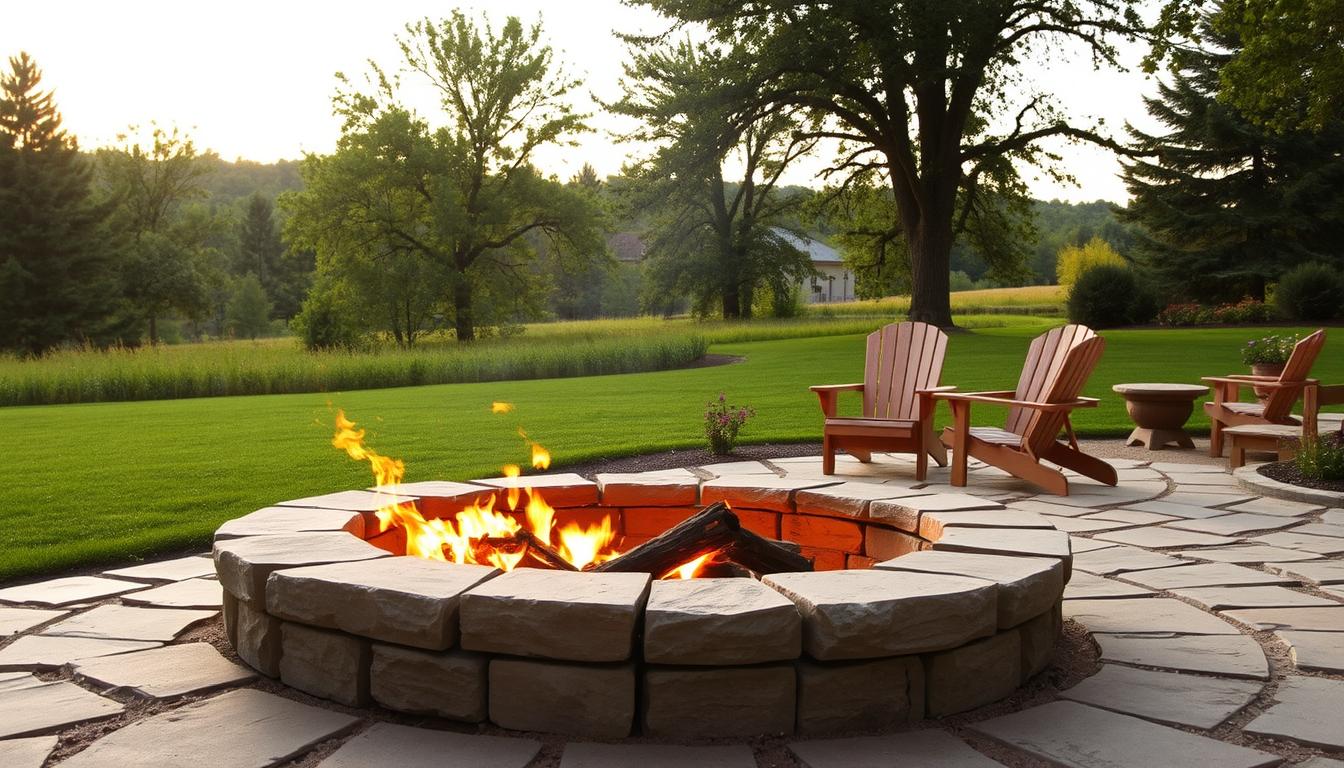
Imagine making your backyard cozy for evenings under the stars. Ever thought about how to install a fire pit yourself? This fire pit installation tutorial shows you how to make a backyard fire pit DIY that’s your own special place.
Before starting, make sure you follow local safety rules. Plan well, keeping your fire pit 10 feet from buildings and trees. With the right tools and a dream, you’re ready for a fun weekend project.
Key Takeaways
- Turn your backyard into a destination with a captivating fire pit built over a weekend.
- Full comprehension of the steps and materials needed for a safe and beautiful fire pit.
- Understanding of local fire codes to ensure your fire pit is both enchanting and compliant.
- Know the specific dimensions and amounts of materials like gravel and sand required.
- Learn to navigate the physical and technical demands of a DIY fire pit installation.
- Find out how regular maintenance can extend the life and beauty of your fire pit.
Understanding the Basics of DIY Fire Pit Installation
Are you thinking of making your backyard better? A fire pit could be just what you need. It makes your evenings cozy and fun. You can enjoy it with family or friends, or just relax by yourself.
Why You Should Consider a Fire Pit for Your Backyard
Picture a night under the stars with a fire crackling. It’s perfect for roasting marshmallows and sharing stories. Fire pits are more than decorations. They’re places for fun and connection. Plus, setting one up is easier than you think.
Essential Tools and Materials for Your Fire Pit Project
First, you need the right tools and materials. You’ll need spray paint, a shovel, and a rubber mallet. Use concrete stones, gravel, and adhesive for strength. Fire pit kits make things simpler by including everything you need.
Choosing the Perfect Location for Your Fire Pit
Finding the right spot for your fire pit is key. It should be 10 feet away from buildings and trees. Make sure it’s level for safety. Avoid places near trees or buildings that could catch fire.
Building a fire pit is more than following rules. It’s about making a place for joy and warmth. Here are some important things to remember:
| Feature | Requirement |
|---|---|
| Distance from structures | Minimum 10 feet |
| Clearance around fire pit | At least six feet |
| Overhead clearance | Minimum 20-25 feet from combustibles |
| Ventilation for gas pits | At least two air vents |
| Burner to edge clearance | Approximately three inches |
Planning Your Fire Pit Design and Layout

Starting a backyard fire pit DIY project needs careful planning. It’s important for both fun and safety. Let’s look at how to pick the right design and layout for your fire pit.
Deciding Between Above-Ground and In-Ground Fire Pits
First, choose between an above-ground or in-ground fire pit. Above-ground pits are simpler to set up. They come in many materials like stones and concrete blocks. In-ground pits blend well with your yard.
Think about what you want and need. Either choice can make your backyard better.
Fire Pit Shapes: Circular, Square, or Custom
The shape of your fire pit matters a lot. Circular pits are great for talking and sitting together. Square or rectangular pits add a modern look and fit well with other shapes.
Custom shapes let you be creative. You can make your fire pit truly special.
Check out this guide for fire pit ideas. It shows many designs, from stone to modern.
Calculating the Right Size for Your Fire Pit Area
The size of your fire pit is important. A 3 to 4 feet diameter is common. But, you need at least 6 feet of space around it for safety and comfort.
For big groups, a bigger pit or extra small pits might be needed. This adds warmth and beauty.
For a diy fire pit installation, use this guide. It helps with choosing materials and designs that look good and work well.
Think about how people will move around your fire pit. Make sure it’s safe and easy to get to. Plan to spend a weekend on your project. This lets you prepare, build, and finish your fire pit.
Preparatory Steps for a Smooth Installation Process

Before starting your how to install a fire pit project, some steps are key. You need to check local rules and get your site ready carefully. Let’s look at these important steps for your fire pit installation tutorial.
Checking Local Regulations and Safe Distances
First, check your local building codes or homeowners’ association rules. Make sure your fire pit follows these to avoid legal problems. Also, it won’t hurt your homeowner’s insurance.
Most DIY fans say following the law is very important. Always keep a safe distance from buildings and property lines. This prevents dangers.
Marking the Fire Pit Area and Preparing the Site
After getting approval, mark the fire pit area with spray paint and a string. Make the marks bigger than the fire pit to allow for changes. Most mistakes happen because of wrong measurements.
Then, remove the sod and level the ground. This is a big step for a strong and stable fire pit. It’s what 60% of people do for a good installation.
Before you start the next part, check these steps. Good preparation makes the installation easier and safer. It will make your fire pit a great part of your outdoor space.
How to Install a Fire Pit: Step-by-Step DIY Guide

Want to make your backyard cozier? Learning how to install a fire pit is a great start. A backyard fire pit DIY project can change your outdoor area. It’s perfect for both fun gatherings and quiet nights.
First, pick the best spot for your fire pit. It should be 10 feet away from anything that can catch fire. After choosing the spot, mark where the fire pit will go. A good size is about 51 inches wide, 32 inches inside, and 16 inches tall.
Start by digging a hole 6 inches deep for the fire pit base. Make sure the bottom is level for stability. Then, fill the base with gravel for drainage and level it out.
Place the first row of paver stones or bricks around the gravel. Use a level to keep them straight. Add more pavers, staggering them for strength and looks. For extra heat protection, add firebricks inside the pit.
Use masonry adhesive to hold the layers together. This step is optional but helps, even more, with taller pits. Before finishing, put a metal ring inside to protect the pavers from flames.
After finishing, let the adhesive dry for about a week. Then, your fire pit is ready. Remember to clean it often to keep it looking good.
Building a fire pit is a rewarding weekend project. It makes your outdoor space better and can even increase your home’s value. This fire pit installation tutorial helps you create a warm, welcoming spot for your family and friends.
Constructing the Foundation for Your Fire Pit

Building a strong foundation is key to a great outdoor fire pit. It makes your fire pit last longer and safer. Let’s go through the easy steps to get your fire pit ready for cozy nights.
First, pick the best spot for your fire pit. Make sure it’s at least 10 feet away from buildings and trees. For even more safety, aim for 25 feet.
Then, remove about 2 inches of grass. This makes room for your base materials.
Layering Gravel and Sand for Drainage and Stability
Start with 5 inches of gravel. This base is stable and drains well. It keeps your fire pit dry and strong.
After laying the gravel, wet it well. Then, use a tamper to pack it down. This makes a solid base.
Setting Your First Row of Stones or Blocks
Next, place the first row of stones or blocks. Make sure they’re straight and level. This row sets the pattern for the rest.
Build at least 3 to 4 rows of blocks. Stagger the joints for extra strength. This makes your fire pit stable.
Here are some important tips and facts for your fire pit:
| Parameter | Specification |
|---|---|
| Ideal Interior Diameter | 3 to 4.5 feet |
| Recommended Safety Distance from Structures/Trees | At least 10 feet; ideally 25 feet |
| Suggested Fire Pit Depth | 1 foot |
| Recommended Distance for Outdoor Furniture | 6 to 7 feet |
| Minimum Depth for Sod Removal Before Paver Base | 2 inches |
| Recommended Thickness of Gravel Base | Approximately 5 inches |
Follow these tips for a solid fire pit base. This way, you’ll have many fun outdoor nights. A good base is the start of a great fire pit.
Building the Fire Pit Walls

Building the walls of your fire pit is very important. You need to be careful and follow safety rules. Making sure the walls are straight and strong is key for a good fire pit.
When starting the wall construction, make sure each stone is flat and fits well. A rubber mallet helps move stones without breaking them. It’s also good to use masonry adhesive between the stones. This keeps the fire pit from moving over time.
Here’s a table with easy steps and tips for building your fire pit walls:
| Step | Details | Tips |
|---|---|---|
| 1. Align First Layer | Put the first layer of stones around the fire pit area, making sure they’re even. | Use a lever to check if the base layer is stable. |
| 2. Apply Adhesive | Put a lot of masonry adhesive on top of the first layer for the second layer of stones. | Apply adhesive in a zigzag pattern for better coverage. |
| 3. Stack Subsequent Layers | Keep stacking and aligning stones, adding adhesive between each layer. | Make the joints staggered for better strength. |
| 4. Final Adjustments | After reaching the desired height, check if the fire pit walls are straight and stable. | If a layer looks uneven, tap the stones gently with a rubber mallet. |
Following this guide carefully will make your fire pit safe and beautiful. So, get your tools ready and start building!
Finishing Touches to Enhance Your Fire Pit

After building your fire pit, it’s time for the last steps. These steps make it safer and look better. We’ll show you how to add fire bricks, a metal ring, stone caps, and decorative rocks. These will make your fire pit a beautiful part of your yard.
First, fire bricks are key for safety. They can handle high heat and protect your fire pit. A metal ring inside keeps the fire in, stopping damage to the bricks or blocks.
For looks, stone caps make the edges neat. Decorative stones like lava rocks add a rustic beauty. Here’s a table to help you pick the best look for your fire pit:
| Material | Appearance | Benefits |
|---|---|---|
| Lava Rocks | Rustic, natural | Heat-resistant, improves drainage |
| Fire Glass | Modern, sleek | Reflects light, available in various colors |
| Stone Caps | Polished, structured | Offers a finished look, adds durability |
| Ceramic Stones | Artistic, varied shapes | Withstands high temperatures, decorative versatility |
These extras make your fire pit safer and prettier. Stone caps can be seats or tables. The metal ring helps your fire pit last longer by keeping it away from flames.
These touches make your fire pit more than just warm. They make it a cozy spot for family nights or parties. With the right touches, your fire pit will be the best part of your yard.
Preparing for Your First Fire: Safety and Tips

As you gather around your new fire pit, it’s important to know safety tips. These will make your time by the fire enjoyable and safe. Whether it’s a cozy night with family or a fun time with friends, here’s what you need to know.
Firewood Layering Technique: Start by layering your firewood right. First, put down small kindling like dry leaves or newspaper. This helps the fire start fast. Then, add smaller logs on top, and as the fire grows, add bigger logs.
Fire Pit Safety Essentials: Fire pit safety is very important. Keep your fire pit 10 feet away from anything that can catch fire. This includes yard debris, as Homeland Security warns. Always have water, sand, or a fire extinguisher ready for any fire that gets too big.
- Check if your pit is stable before lighting to avoid it tipping over.
- Use a spark guard to catch flying embers and stop sparks from spreading.
- Make sure the area around the fire pit is clear of leaves and flammable stuff to avoid fires.
Maintenance Tips: After enjoying your fire, make sure to put it out completely. Homeland Security says to use water and stir the ashes to check for any hot spots. Clean your fire pit often. Scoop out the ashes and check for damage before using it again.
By following these safety tips and layering your firewood right, you’re ready for many safe and fun nights by the fire.
Maintenance and Care for Your New Fire Pit

Keeping your fire pit safe and welcoming needs regular care. Clean it often and protect it from the weather. This way, your fire pit will last longer and work better.
Fire Pit Maintenance
It’s important to keep your fire pit in good shape. Here’s how to do it based on how much you use it and where you live:
| Usage and Climate | Cleaning Frequency |
|---|---|
| Light use in a dry climate | 1-2 times per year |
| Moderate use in a damp climate | 2-3 times per year |
| Heavy use in any climate | 3-4 times per year |
| After rain or storms | Clean ASAP after exposure |
Not taking care of your fire pit can cause problems. It might not heat up well, have gas flow issues, or even get damaged. This can be dangerous.
Protecting Your Fire Pit
- Use fire pit covers to protect it from bad weather.
- Apply a metal protectant after cleaning to stop rust.
- Keep removable parts like propane tanks in a dry, well-ventilated place.
Covering your fire pit when not in use keeps it clean and safe. It stops rust and cracks. This simple action makes sure your fire pit is always ready for fun.
Fire pit care is about keeping it safe and fun for your family all year. By following these steps, you make sure your fire pit adds warmth and beauty to your outdoor time.
Conclusion
Your journey to install a fire pit is done. You now have a new centerpiece for your backyard. Making a fire pit yourself is more than fixing up your home. It’s about creating a cozy spot for special moments.
Remember to keep your fire pit safe. Make sure it’s far from things that can catch fire and high enough above the burner. This way, your fire pit is not only pretty but also safe to use.
There are many ways to make your fire pit look unique. You can choose from ceramic logs, fire glass, or lava rocks. Each choice makes your fire pit special. Also, taking care of your fire pit will make it last longer.
Gas fire pits are good for the environment. If you have a propane fire pit, it’s easy to take care of and you can move it around. This makes your fire pit easy to maintain.
Make your outdoor area better with new fire pit burners. Try the Crossfire burner for efficiency or the Torpedo and Bullet burners for big flames. The HPC Fire Penta burner gives a full flame and fits many designs.
Before lighting your fire, think about your design choices. Drop-in pan inserts and ready-to-finish kits make it easier to install. Now, your backyard is ready for relaxing and fun times under the stars.
FAQ
Why should I consider adding a fire pit to my backyard?
A fire pit adds warmth and ambiance to your outdoor space. It’s great for cooking and gathering with friends and family. It makes any evening special.
What materials do I need to build a fire pit?
You’ll need gravel for drainage and a shovel for digging. Use masonry adhesive to bond the stones. You’ll also need concrete landscaping stones or blocks.
Optional items include a metal fire ring and fire bricks for lining.
How do I choose the perfect location for my fire pit?
Choose a spot at least 10 feet from buildings. It should be away from flammable materials and not under overhanging branches. Check local laws and homeowners’ association rules.
Should I build an above-ground or in-ground fire pit?
It depends on what you like and your yard. Above-ground pits are easy to maintain and visible. In-ground pits blend with your landscape.
What shapes can I consider for my fire pit and does it affect construction?
Common shapes are circular and square. You can also choose a custom design. The shape affects the blocks you need.
How do I calculate the right size for my fire pit?
Think about how many people you’ll host and your outdoor space. A 3 to 4 feet diameter is a good size for coziness and function.
What regulations should I check before installing a fire pit?
Check local building codes and homeowners’ association rules. This ensures your fire pit is safe and doesn’t affect your insurance.
How do I mark the fire pit area and prepare the site?
Use spray paint or a string line to mark the area. Remove grass and dirt to create a level base. This ensures drainage and stability.
How do I layer gravel and sand correctly for my fire pit?
Pour 5 inches of gravel as a base and compact it. Use sand for leveling and a stable base for the stones or blocks.
What is the best way to set the first row of stones or blocks?
Lay the first row on the gravel base, ensuring they’re aligned and level. Use a rubber mallet to adjust the stones if needed.
How do I ensure my fire pit walls are aligned and stable?
Stack the stones carefully, checking alignment as you go. Use a level and rubber mallet for evenness. Apply masonry adhesive between layers for stability.
What’s the purpose of masonry adhesive in fire pit construction?
Masonry adhesive bonds the stones or blocks together. It makes your fire pit durable and secure against heat.
Should I line my DIY fire pit with anything for safety?
Yes, lining with fire bricks protects the stone from flames. It extends your fire pit’s life and improves safety.
How can I enhance the look of my fire pit?
Add stone caps for a finished look. Use decorative rocks like lava rocks for aesthetics. You can also add seating or a cooking area.
What are the best practices for layering firewood?
Start with newspaper or dry leaves and small sticks. Then add larger branches and logs. This helps the fire ignite well and burn steadily.
Can you provide some fire safety tips?
Always have a hose or fire extinguisher nearby. Never leave the fire unattended. Make sure the fire is out before leaving it.
How should I clean and maintain my new fire pit?
Remove ashes after each use to prevent buildup. Scrub the stones or bricks to remove residue. Regular cleaning keeps your fire pit safe and looking good.
How do I protect my outdoor fire pit from the elements?
Cover your fire pit when not in use to protect it from rain and debris. Seal the stonework to prevent erosion or damage from weather