
How to Press and Frame Autumn Leaves for Wall Art
Got a pile of gorgeous autumn leaves and a blank wall begging for some personality? Nature’s giving away free art materials, and I’m here to show you how to turn those vibrant fall treasures into frame-worthy masterpieces. No fancy art degree required — just some basic supplies and a little patience. Ready to bring the outdoors in? Let’s preserve those fleeting fall colors before they crumble into dust!
This post contains affiliate links. If you purchase through these links, I may earn a small commission at no extra cost to you. Learn more here.
What You’ll Need to Press and Frame Autumn Leaves
Everything you need to transform fall leaves into wall art
For Collecting Leaves
- A container to safely transport leaves
- Scissors or garden snips (for picking leaves directly from trees)
- Paper towels to absorb excess moisture
- A field guide to identify interesting leaf species (optional but fun!)
For Preserving Leaves
- Heavy books or a plant press
- Absorbent paper (newspaper works great)
- Wax paper sheets
- Glycerin solution (2 parts water to 1 part glycerin)
- Small paintbrush for glycerin application
Ready to Start Your Leaf Art Project?
Grab a complete leaf pressing kit with all the essentials you need. These kits include absorbent papers, pressing boards, and detailed instructions to help you achieve perfect results.
Finding and Collecting Perfect Autumn Leaves
The secret to stunning leaf art? Starting with stunning leaves! Fall might give us plenty of options, but not all leaves are created equal. You want specimens that’ll make your walls pop with those classic autumn vibes.

When to Collect Your Leafy Treasures
Timing is everything! Head out right after the leaves change color but before they start to dry out and curl. That sweet spot usually lasts about a week after they’ve fallen. Pro tip: morning collection after a dry night (not rainy!) gives you the freshest specimens. 🙂
What Makes a Frame-Worthy Leaf?
- Perfect condition – No tears, holes, or insect damage
- Vibrant color – The brighter, the better!
- Interesting shapes – Maple leaves are classic, but oak, birch, and ginkgo offer unique silhouettes
- Relatively flat – Leaves with fewer bumps and ridges press more evenly
- Variety – Collect different sizes, colors, and species for more creative options
Ever wondered why some leaves turn red while others go yellow? It’s all about chemistry! Leaves with more anthocyanins turn red and purple, while those rich in carotenoids become yellow and orange. Collecting a mix gives your art a full autumn palette.
How to Preserve Your Autumn Leaves
Now that you’ve gathered nature’s confetti, let’s make sure those vibrant colors stick around longer than your last diet attempt. There are several ways to preserve fall leaves, and I’ll walk you through the most effective methods.
Method 1: The Classic Book Press
This is the OG method your grandma probably taught you, and guess what? It still works perfectly!
- Lay your leaves flat between two sheets of absorbent paper or newspaper
- Place this leaf sandwich inside a heavy book
- Stack more books on top (finally, a use for those college textbooks!)
- Wait patiently for 1-2 weeks until leaves are completely dry
- Carefully remove and store between sheets of wax paper until framing
“The book-pressing method is my go-to because it’s simple and gives consistently flat results. Just make sure you’re using books you don’t mind potentially warping if the leaves have moisture.”
— Joely Rogers, Natural Science Illustrator
Method 2: The Glycerin Soak (For Flexible Leaves)
Want leaves that stay pliable instead of crispy? The glycerin method is your BFF.

- Mix 2 parts hot water with 1 part glycerin in a shallow pan
- Submerge your leaves completely in the solution
- Place something light on top to keep leaves from floating
- Let them soak for 3-4 days until they feel supple
- Remove and gently pat dry with paper towels
Preserve Your Autumn Leaves Beautifully 🍁
Extend the life and color of your pressed leaves with a touch of vegetable glycerin. It keeps leaves soft, vibrant, and long-lasting—perfect for framing or crafts.
Heads up! The glycerin method may slightly alter leaf colors. Yellows typically maintain their color best, while reds and oranges might take on a more brownish hue. If preserving the exact color is your top priority, stick with the pressing method.
Method 3: Wax Paper Ironing
Short on patience? This quick method seals leaves between wax paper sheets.
- Place leaves between two sheets of wax paper
- Cover with a thin towel or cloth
- Iron on low heat until the wax paper sheets seal together
- Let cool completely before handling
- Trim around the leaves, leaving a small wax paper border
Creative Ways to Frame Your Pressed Autumn Leaves
Now for the fun part — turning those preserved leaves into wall-worthy art! There are tons of ways to display your leafy treasures, from traditional frames to more creative approaches.

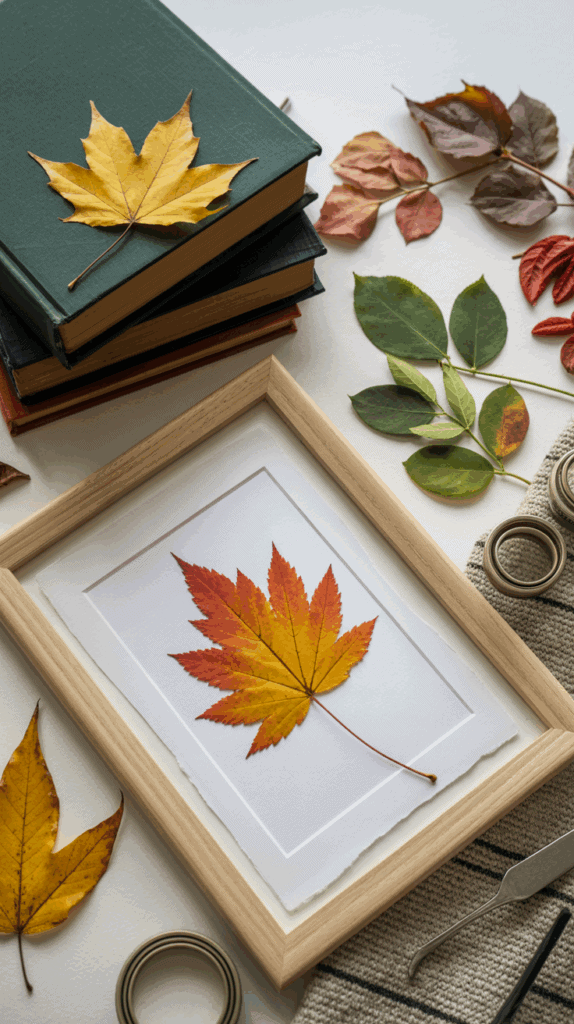
Traditional Framing (The Classic Approach)
This method works beautifully for single statement leaves or artistic arrangements.
- Select a frame with glass or acrylic front (shadow boxes work great for depth)
- Cut acid-free mat board to fit your frame
- Arrange leaves on acid-free backing board
- Secure leaves with tiny dots of acid-free adhesive
- Place mat over the arrangement
- Assemble frame according to manufacturer’s instructions
Frame Your Pressed Leaves in Style 🖼️
Display your preserved leaves with elegance. Choose natural wood frames that complement your autumn hues and turn your pressed leaves into timeless wall art.
Floating Glass Frames (Modern Minimalist)
Show off those leaves with a contemporary vibe. Floating frames let the leaves take center stage.

- Choose a floating frame with two glass/acrylic panels
- Clean both panels thoroughly (fingerprints are the enemy!)
- Position leaves on the back panel
- Secure with tiny dots of clear adhesive if needed
- Carefully place the front panel and secure the frame
FYI: While framers typically don’t recommend sandwiching artwork directly between glass (due to potential moisture issues), for seasonal decor pieces, floating frames create a stunning effect. Just be aware they may not preserve the leaves indefinitely.
Creative Arrangement Ideas
- Ombré effect – Arrange leaves from light to dark
- Species collection – Frame different leaf types with botanical labels
- Seasonal gradient – Show the progression of a single leaf changing colors
- Leaf mandala – Create circular patterns with leaves of different sizes
- Pressed branch – Frame an entire small branch with multiple leaves
- Leaf silhouettes – Place leaves on colored paper for contrast
- Mixed media – Combine leaves with pressed flowers or ferns
- Seasonal triptych – Create a series of three coordinated frames

Tips for Displaying Your Leaf Art
You’ve pressed and framed those gorgeous leaves — now let’s make sure they look amazing on your walls and stay beautiful for years to come.

Perfect Placement for Leaf Art
- Avoid direct sunlight – UV rays will fade those vibrant colors faster than a cheap t-shirt
- Keep away from humidity – Bathrooms and kitchens can introduce moisture that damages pressed leaves
- Create a gallery wall – Mix leaf frames with other nature-inspired art for a cohesive look
- Consider seasonal rotation – Display your leaf art during fall and winter, then swap for other pieces in spring and summer
“I love creating seasonal gallery walls where leaf art becomes the star in autumn. The key is using frames that coordinate with your existing decor so the transition feels natural.”
— Home Styling Enthusiast
Extending the Life of Your Leaf Art
Want your leaf masterpieces to last beyond a single season? These preservation tips will help:
- Use UV-protective glass or acrylic in your frames
- Ensure leaves are completely dry before framing to prevent mold
- Apply a light spray of clear acrylic sealer for additional protection
- Store unused leaf art flat in a cool, dry place when not displayed

How long will pressed and framed leaves last?
With proper framing and care, pressed leaves can last for many years. Using acid-free materials and keeping them out of direct sunlight significantly extends their lifespan. Leaves preserved with glycerin tend to be more flexible but may not retain their exact original colors as long as properly pressed and dried leaves.
Can I press leaves that have already started to dry out?
Yes, but with mixed results. Leaves that have already begun to dry and curl may not flatten as perfectly as fresh ones. If you’re working with partially dried leaves, try the glycerin method first to reintroduce some moisture before pressing, or mist them very lightly with water before placing them between absorbent papers.
Ready to Create Your Own Autumn Leaf Art?

There you have it — everything you need to press and frame autumn leaves like a pro! This simple project lets you capture fall’s fleeting beauty and enjoy it all year round. The best part? It’s incredibly affordable compared to store-bought art, and each piece tells the story of your own autumn adventures.
Remember, the key to stunning leaf art is starting with beautiful specimens, preserving them properly, and displaying them thoughtfully. Whether you go for traditional framing or get creative with floating glass, your preserved leaves will bring a touch of nature’s artistry to your home.
So grab a container, head outside during peak fall color, and start collecting! Your walls are waiting for that perfect pop of autumn. And hey, if anyone asks about your gorgeous new art, you can casually mention you made it yourself. 😉
Ready to start your autumn leaf art project?
Gather all the supplies you need in one convenient kit. This complete leaf pressing and framing set includes everything from collection tools to preservation materials and display options.
Get Your Complete Leaf Art Kit